
Porsche 935 Baby | Italeri 1:24
Update 1 | 26.05.2021
Porsche has developed a special line of cars with distinctive engine and chassis solutions to compete in the FIA Group 5 automotive competition. Several models were made, but the 935J was the best for its time. "Baby", as it was called, was built to compete in the two-liter German championship. The total weight of this car was 735 kg. The car used an air-cooled 1.425 engine with a capacity of 261 kW.
The 1977 German Grand Prix was an important victory for this model.

The Italeri kit comes from 2020. It seems to be no difficult to build and has few elements. I will verify how the fitting looks like.
Italians are not famous for good castings, but it does not hurt to spend more work to this car to achieve a satisfying result.


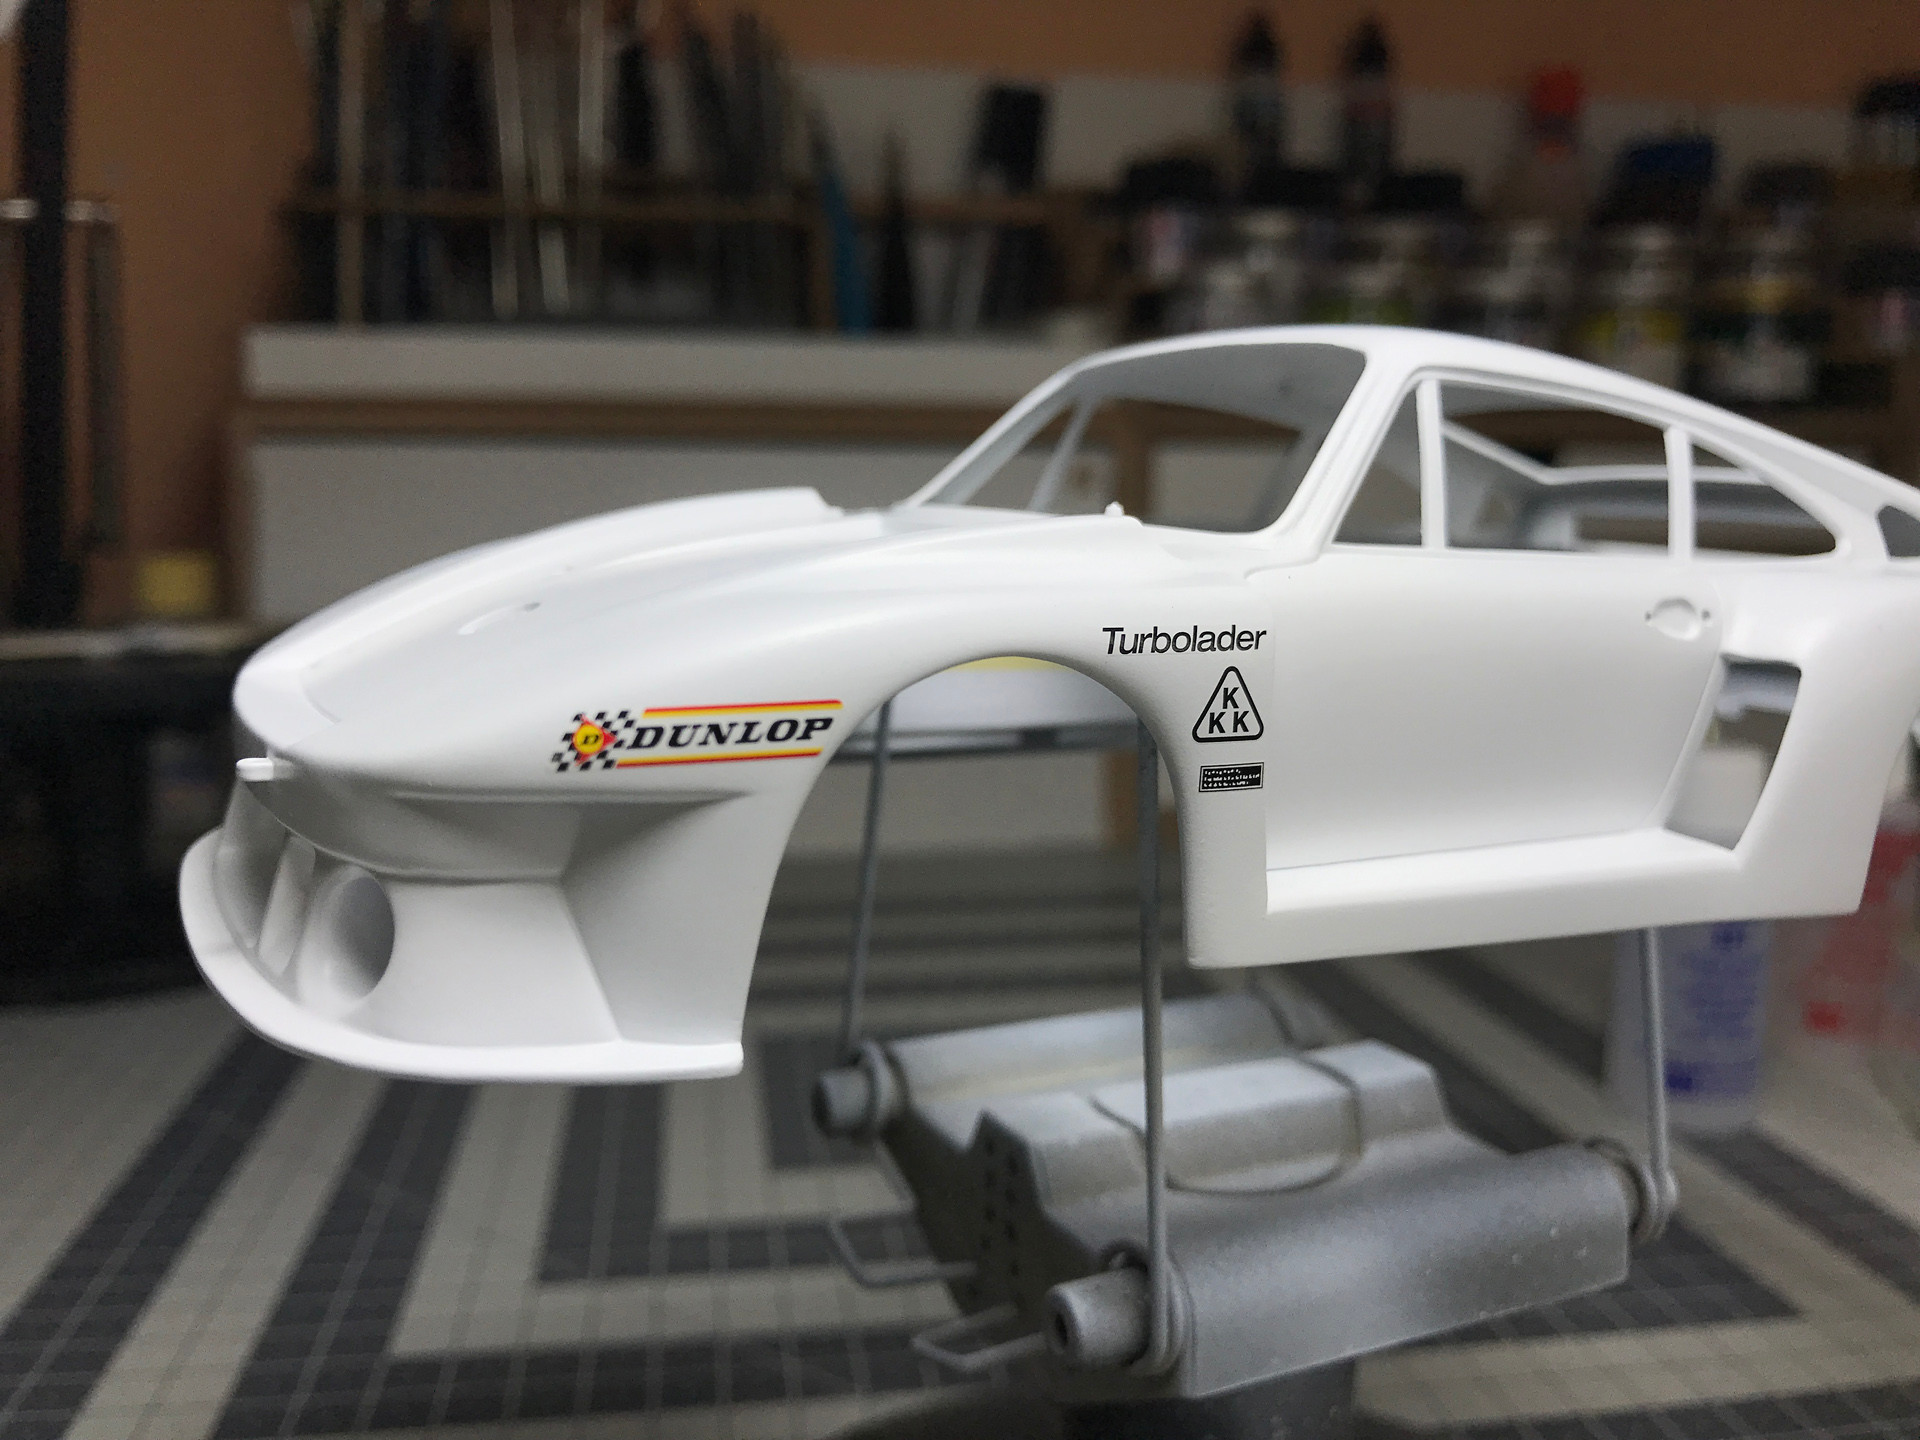
The car body does not look too bad. You can see the seams on the roof, front bumper and fenders, but actually - every kit has. I found the panel lines to be very shallow so they will need to be deepened.


Porsche 935 Baby in this set is flagged with Martini Racing emblems. The decals look very good and there are quite a lot of them, more than 40. After all, it's a racing car ... and they are a running advertisement!


Update 2 | 17.08.2021
After cutting all parts of the chassis and interior from the sprues, there are some imperfections. This is a bit surprising because the Italeri has been on the market for many years and should do better in the castings. In order to improve the apperance of these elements, I used a putty.


After looking at a few photos and evaluating the item, I decided to enlarge the exhaust opening. I used a hand drill for this. After cleaning the putty and smoothing the unevenness, I painted the elements with a gray and black primer.


The set is very simple to build. It does not contain too many details. The engine consists of two parts. One will be visible from the chassis side, while the other will be visible when the trunk is opened.


I decided to visually enrich two elements. I used a sheet of carbon decal for this.


The dashboard gauges in this set do not contain decals, it is cast in plastic. I painted all the small parts of the dashboard with a very thin brush. To give the gauges a more real look, I soaked the brush in a clear gloss varnish and added a droplet to the individual elements of the clocks.


The driver's seat is equipped with a harness seat belt. Here, the manufacturer did not use decals, but the belts were cast together with the seat. Of course, you can grind them down and use fabric and metal elements. Such kits are available in modeling stores but I decided to leave them as predicted by the manufacturer.


The rest of the elements are as follows.


The Porsche car body casting had a few mold lines, I removed them with a 600 grit abrasive sponge. I used the same gradation to wipe the entire body and a 1200 sponge to smooth it. I used a scraper to deepen the panel lines.
When checking the fitting of the parts, it turned out that the engine cover does not fit well with the rest of the body. It looks as if part of it is too small. I decided to fix it using Milliput two-component epoxy mass. I used the same product to fill in the bumps on the spoiler wing. Earlier, however, for better adhesion of the mass, I rubbed the surface with an abrasive sponge. After the putty had cured, I smoothed it with sandpaper


After another inspection, it turned out that the car body still had a few unevenness. I used gray Tamiya putty to fill them.
After cleaning and degreasing the car body, I painted it with two primers. The first was Mr. Surfacer 1000 (gray). This primer showed me the rest of the imperfections that I missed. In the case where the body is cast in white, it is difficult to see some small imperfections.


The final color of the car will be white. To get better shade, I decided to apply another white primer from Tamiya - Surface Primer. When the primer had cured well, I used a 1500 graded water abrasive sandpaper to smooth the surface.

I painted the entire body with white paint from the Creative Colors palette - Rally White. After 72 hours, I slightly matt the surface with water abrasive paper. And the fun with decals began.
Italeri decals turned out not to be that bad to apply. Some of them I put using Micro Set from Microscale decal solution and the others using Tamiya Mark Fit Strong. I used Micro Sol to make the decal stick better to the surface.
After wrapping the entire car, I put it aside to dry well and allow the decals to settle down. The drying time I chose for myself was 72 hours.


I painted the Porsche with a 2K clearcoat from Creative Colors. When the varnish was dry and cured well, I started polishing with 2,500 to 6,000 water abrasive sandpapers.
The polishing pastes I used are Tamiya Coarse, Fine and Finish.


Now the time-consuming work of taping window seals. I painted them with black paint from Mr. Color 92 (Semi Gloss Black).


The radiator grille in the front bumper did not fit well. I decided to replace it with Radiator Mesh from Scale Production with 0.15 mm mesh size. To my surprise, the chassis fit perfectly with the body, there were no problems with joining these parts together.


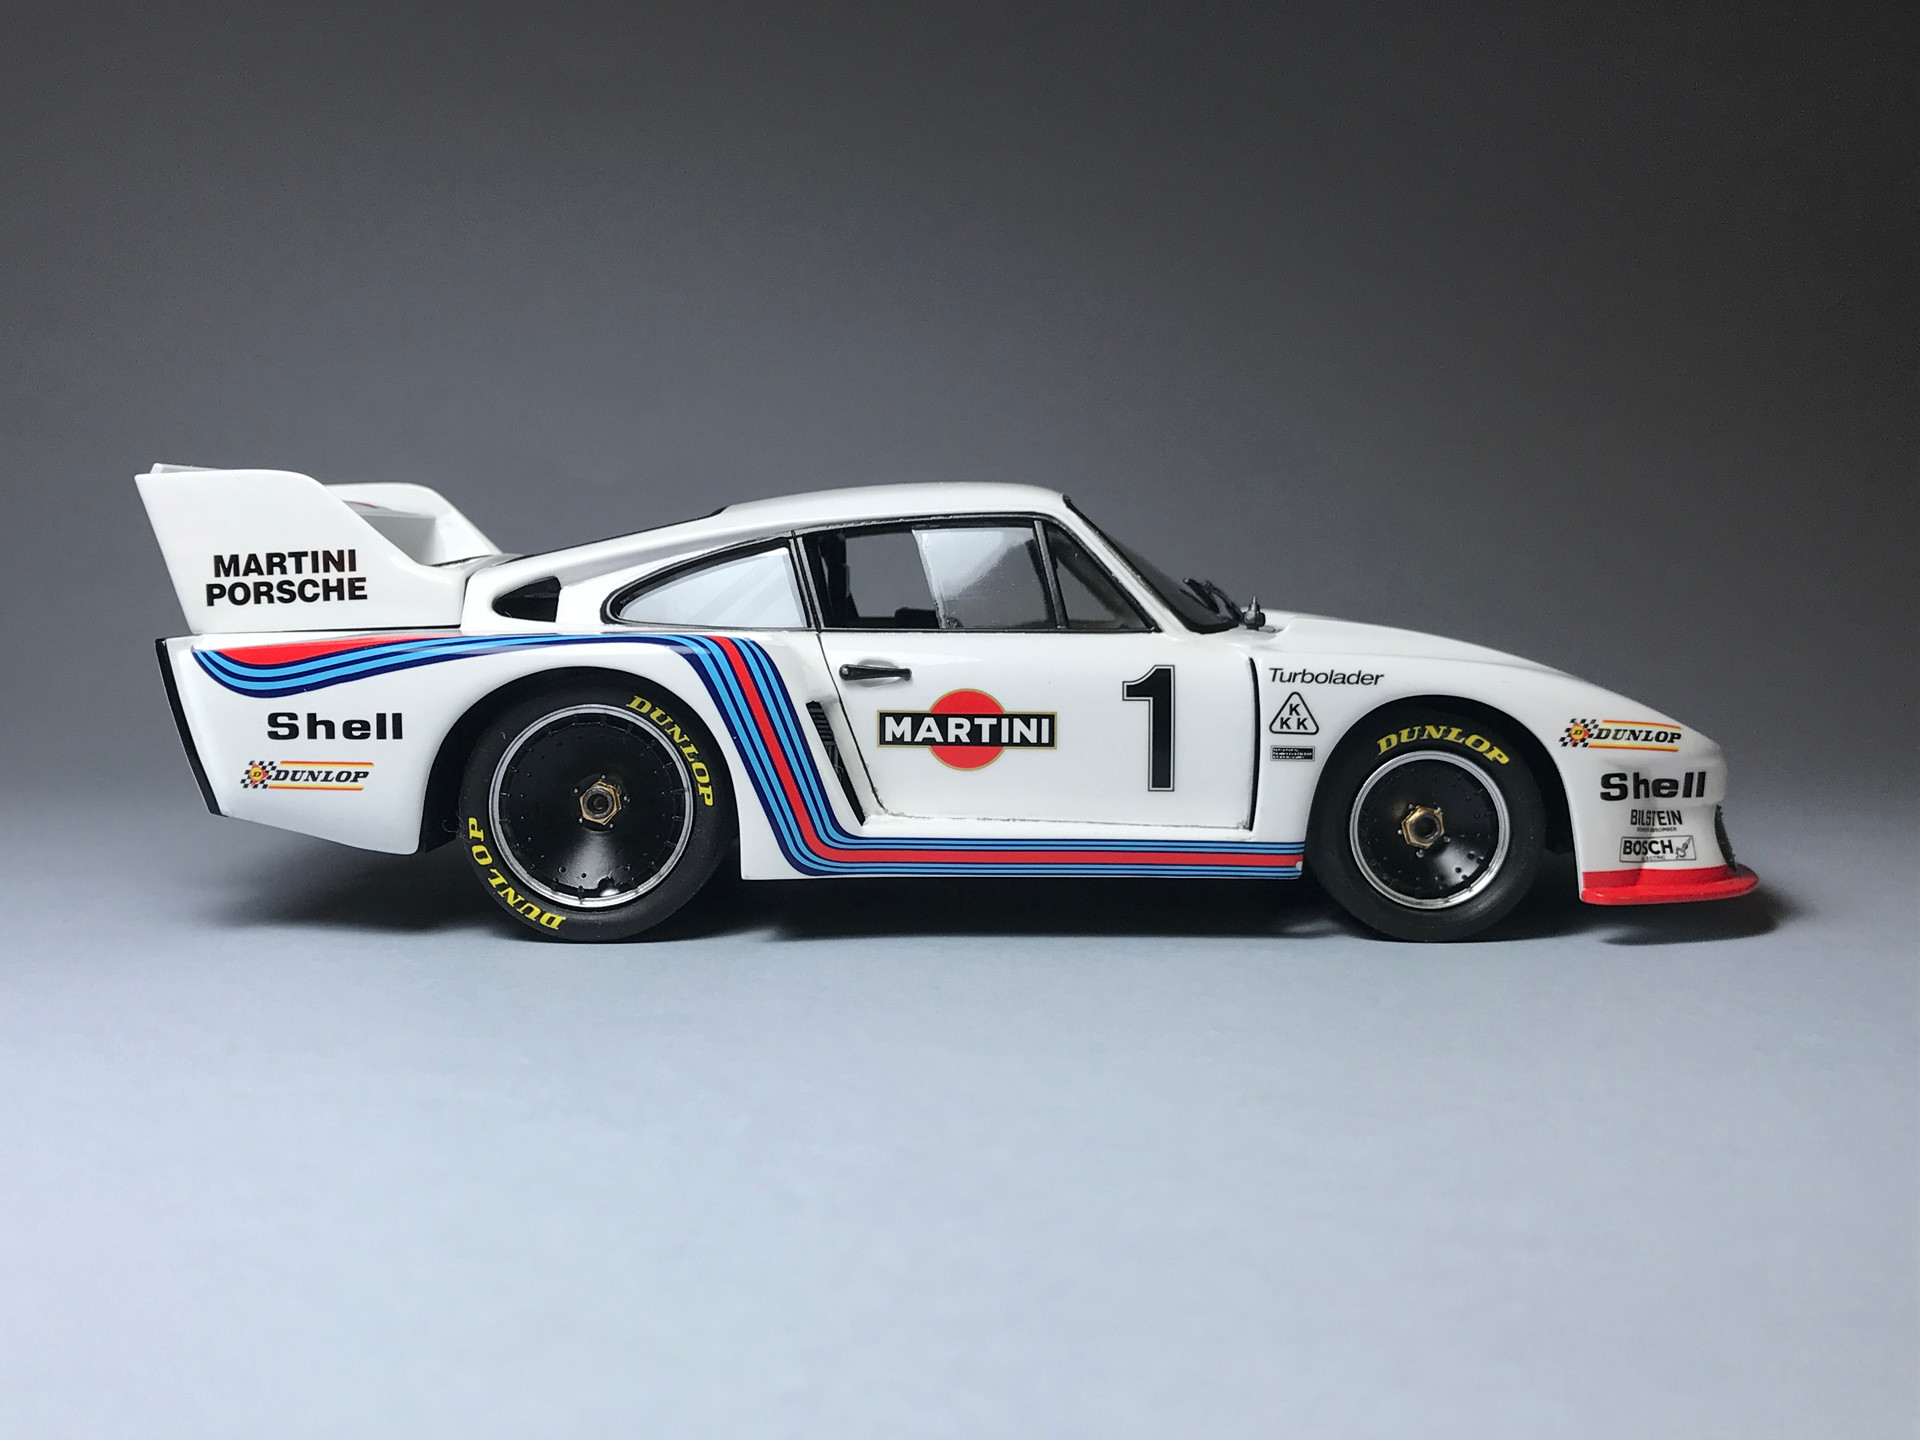

Playing with a Porsche 935 Baby from Italeri was a great adventure and a challenge for me, because it was my first sports car with such a large surface decals.
Next workbench | Porsche Diesel Junior 108

© 2025 | Cookies Policy | Terms & Conditions