
Fiat 131 Abarth | Revell 1:24
Author | Krzysztof Szpakowski
It's time to present another project in 1:24 scale - Fiat 131 Abarth from Revell.

I've had this model for almost 15 years, so it's finally time to build it. The Revell kit comes from 2007 and is a repackaged Esci product from the late 70s, which makes it have many errors such as only two instead of four halogens in the front and wrong rear lamps. The advantage of the set is undoubtedly the Cartograf decals, which, despite the passage of years, still look like new!


The model will be detailed-up with a set of photo-etched plates and details produced by Renaissance TK24/202. Additional details such as seat belts, switches on the dashboard, bolts in the rims, valves or fasteners on the tailgate will be products produced by scalecars.online
The rear lamps will be replaced with Decalcas lamps, while the treaded tires will be replaced with slicks from Toyota Celica.


Despite the high quality of Cartograf's decals, in my opinion, the light blue color of the stripes on the body of the model is wrong. That's why I'm going to cut this part of the decals and paint light blue stripes. For this purpose, I will use HYCOTE - Ford Bermuda Light Blue paint. Primer, white TS-26 and gloss TS-13 will be Tamiya set.

Below a few photos of the Fiat body, which requires a lot of work.


The work has started. The key thing for me in this model is the fine-tuning of the front lights. I removed those ugly flat headlights and replaced them with Opel Manta headlights. The Fiat immediately looks different!
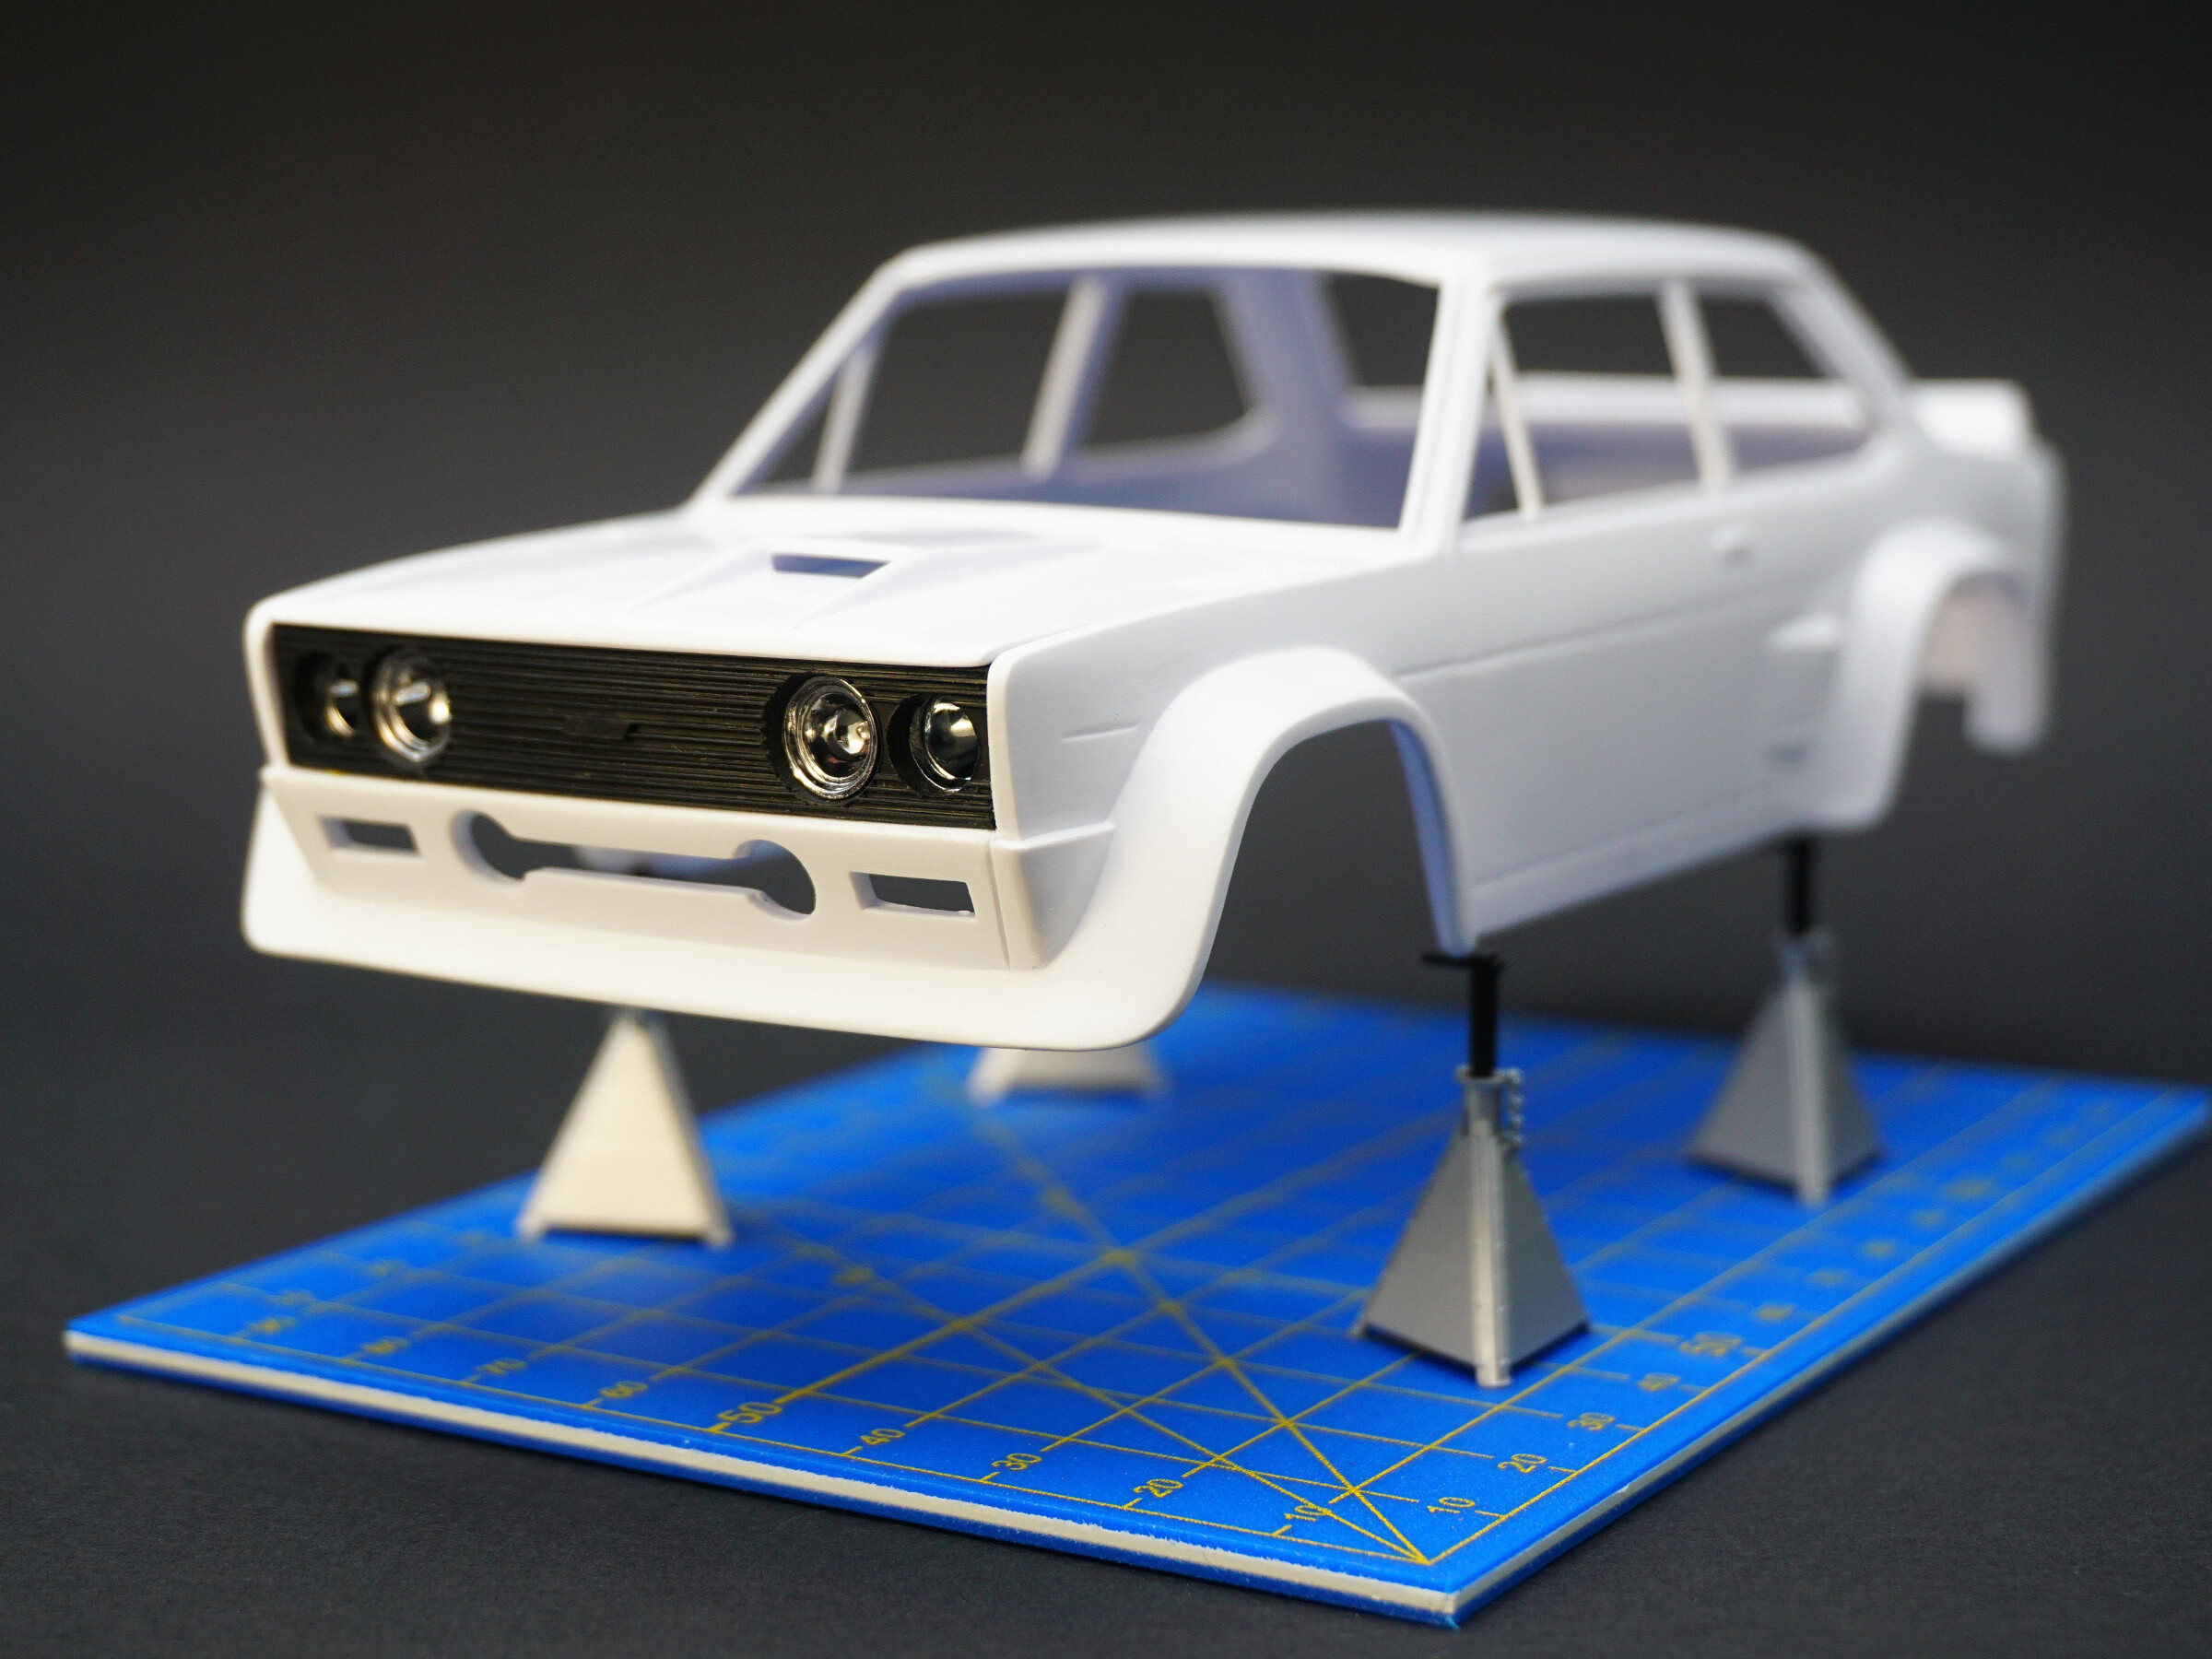
The next stage of work is the modification of the Mirafiori front.
I changed the shape of the front bumper so I can mount the grill lower. This resulted in the hood of the car no longer looking as if it was open or incorrectly closed. I also cut out the missing front bumper panel lines. I drilled the bumper for the towing eye mount, halogen mounts and parking lights.


Rear modifications.
I cut holes for larger Fiat lights after the facelift. I also drilled a hole under the towing eye. Additionally, I made a bumper panel line because the model was completely shapeless.


Front and rear lights fitting test.


The body of the Fiat was redone. There are still a few corrections left, but the panel lines have been deepened and profiled, as well as sheet metal stampings and window seals. I am currently testing the suspension and tires which I changed to slicks.

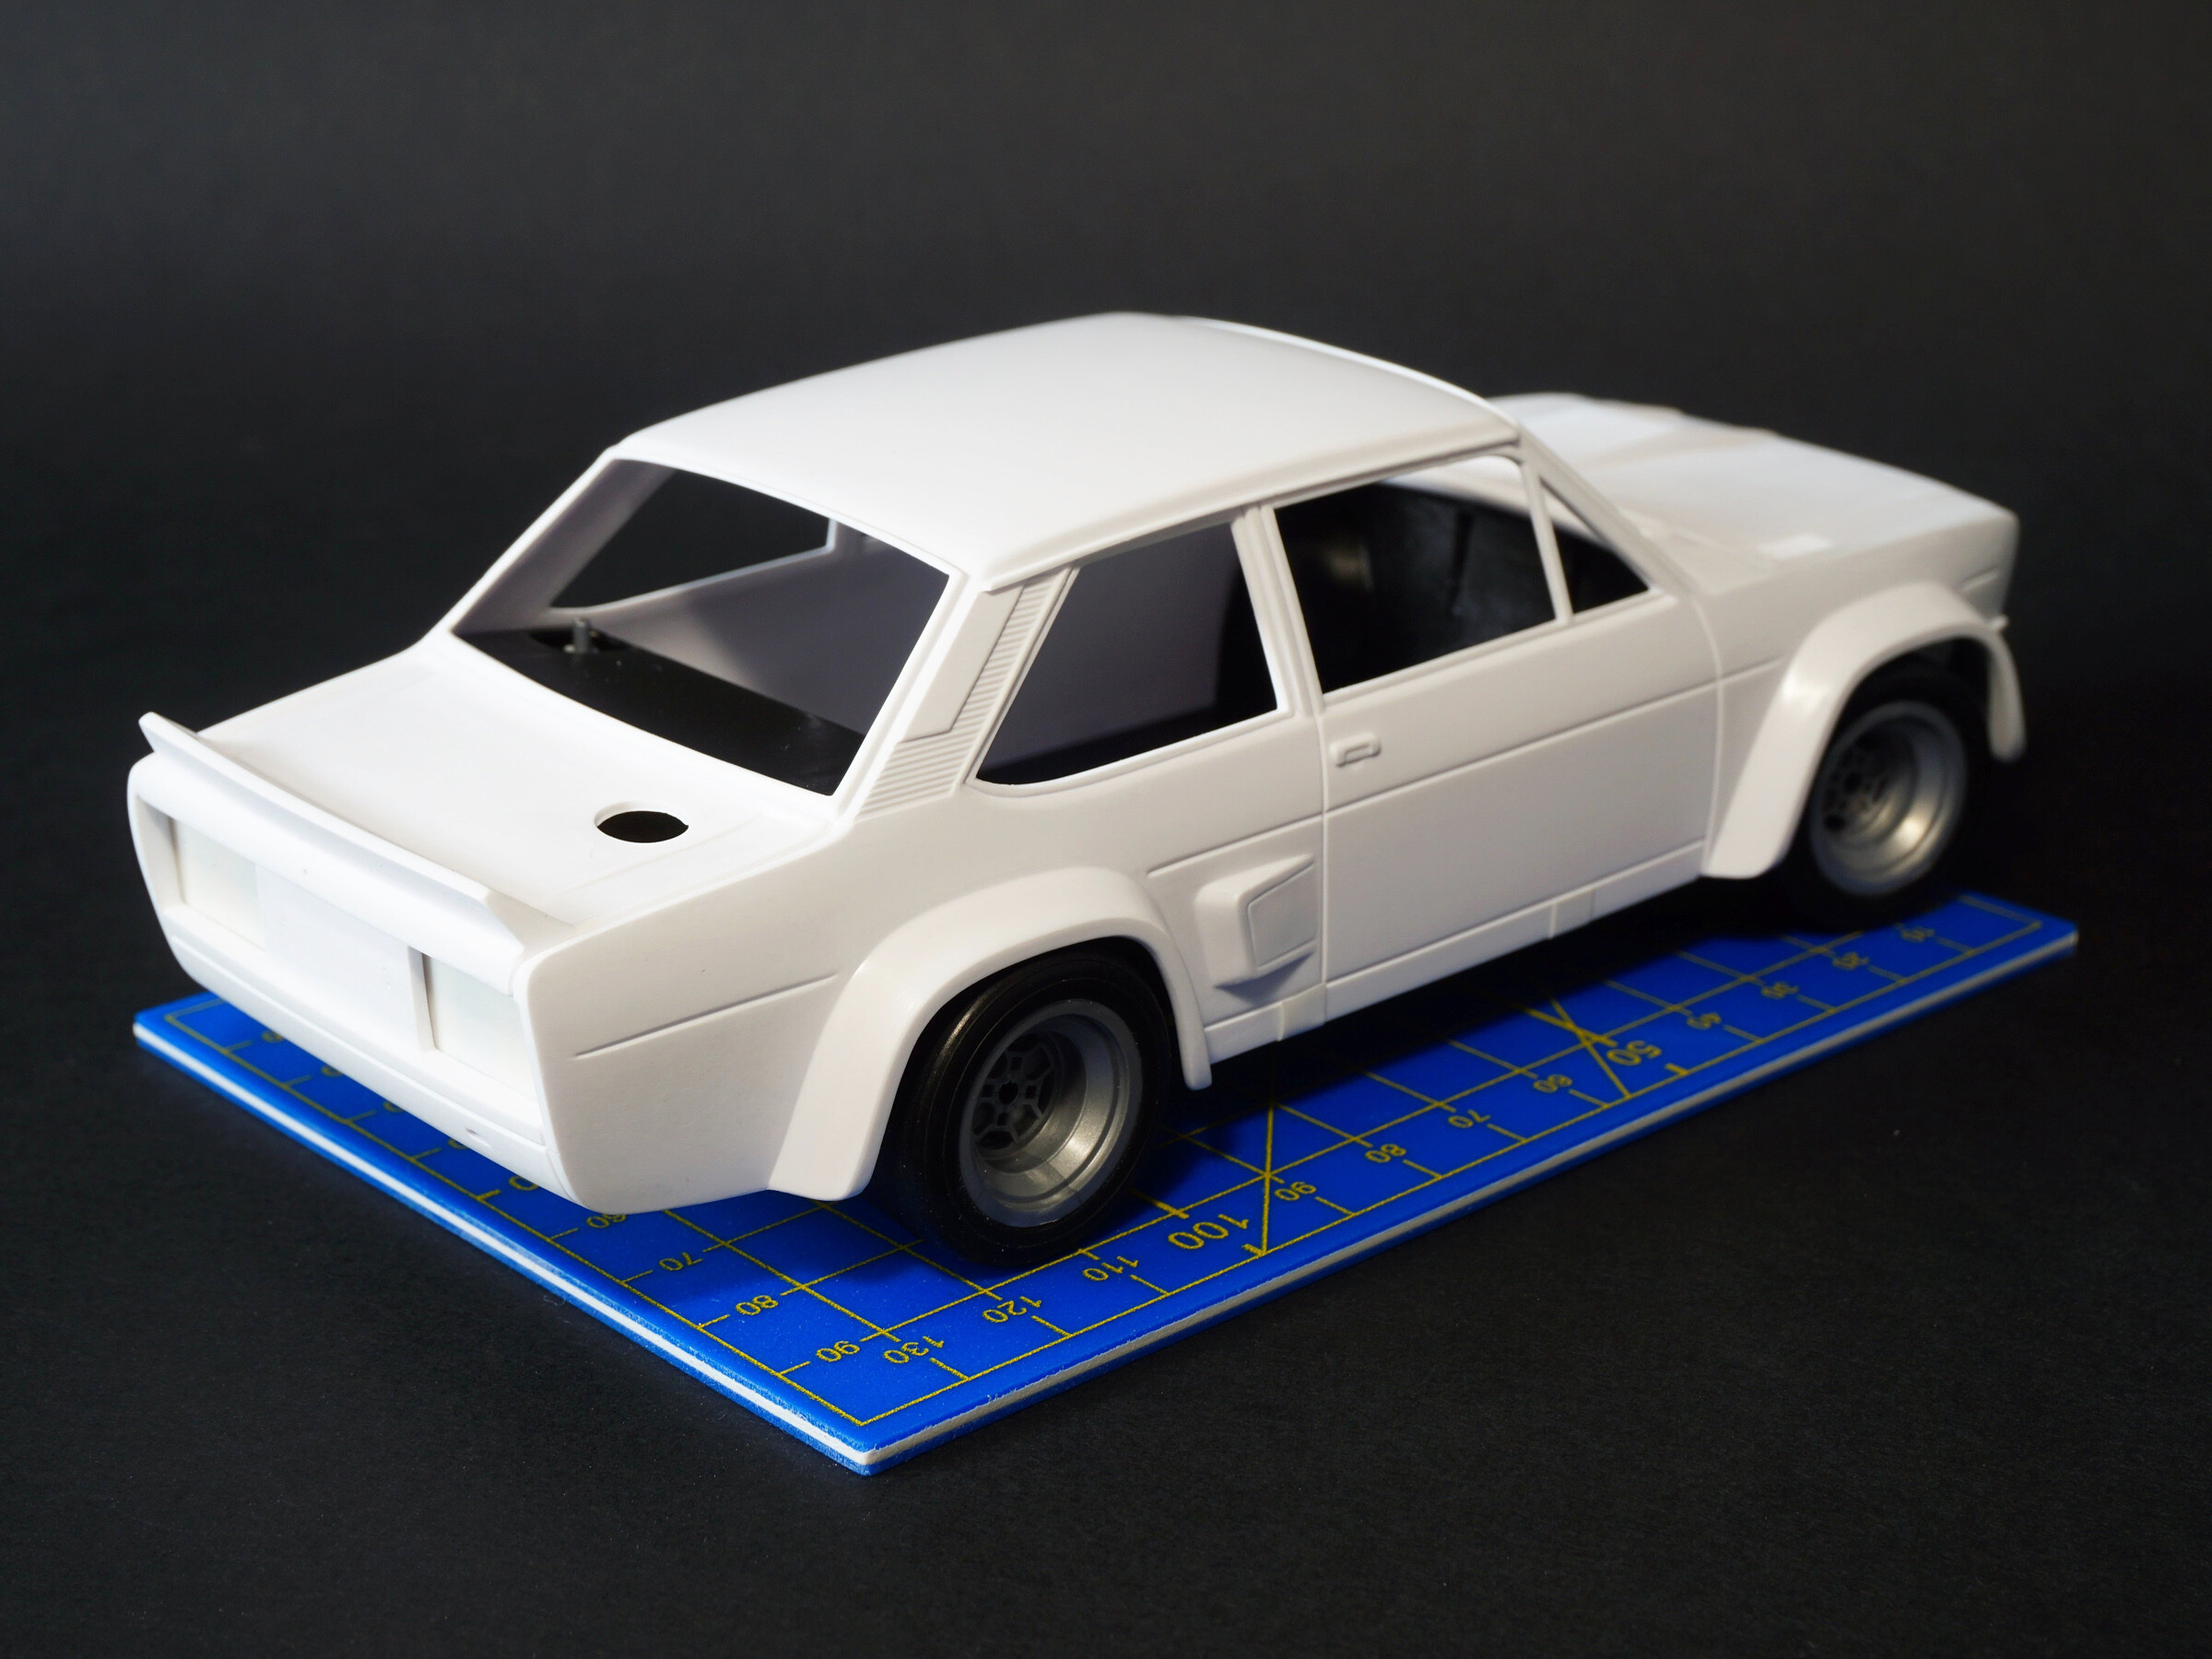
Wheel arches modification.
One of the main things to change when building the 1980 Monte Carlo Rally Fiat is the wheel arches. It is just as important to the model as changing the taillights, because it changes the whole silhouette of the car. It is worth mentioning, because many modelers do not realize it, or even worse, do not see the difference.


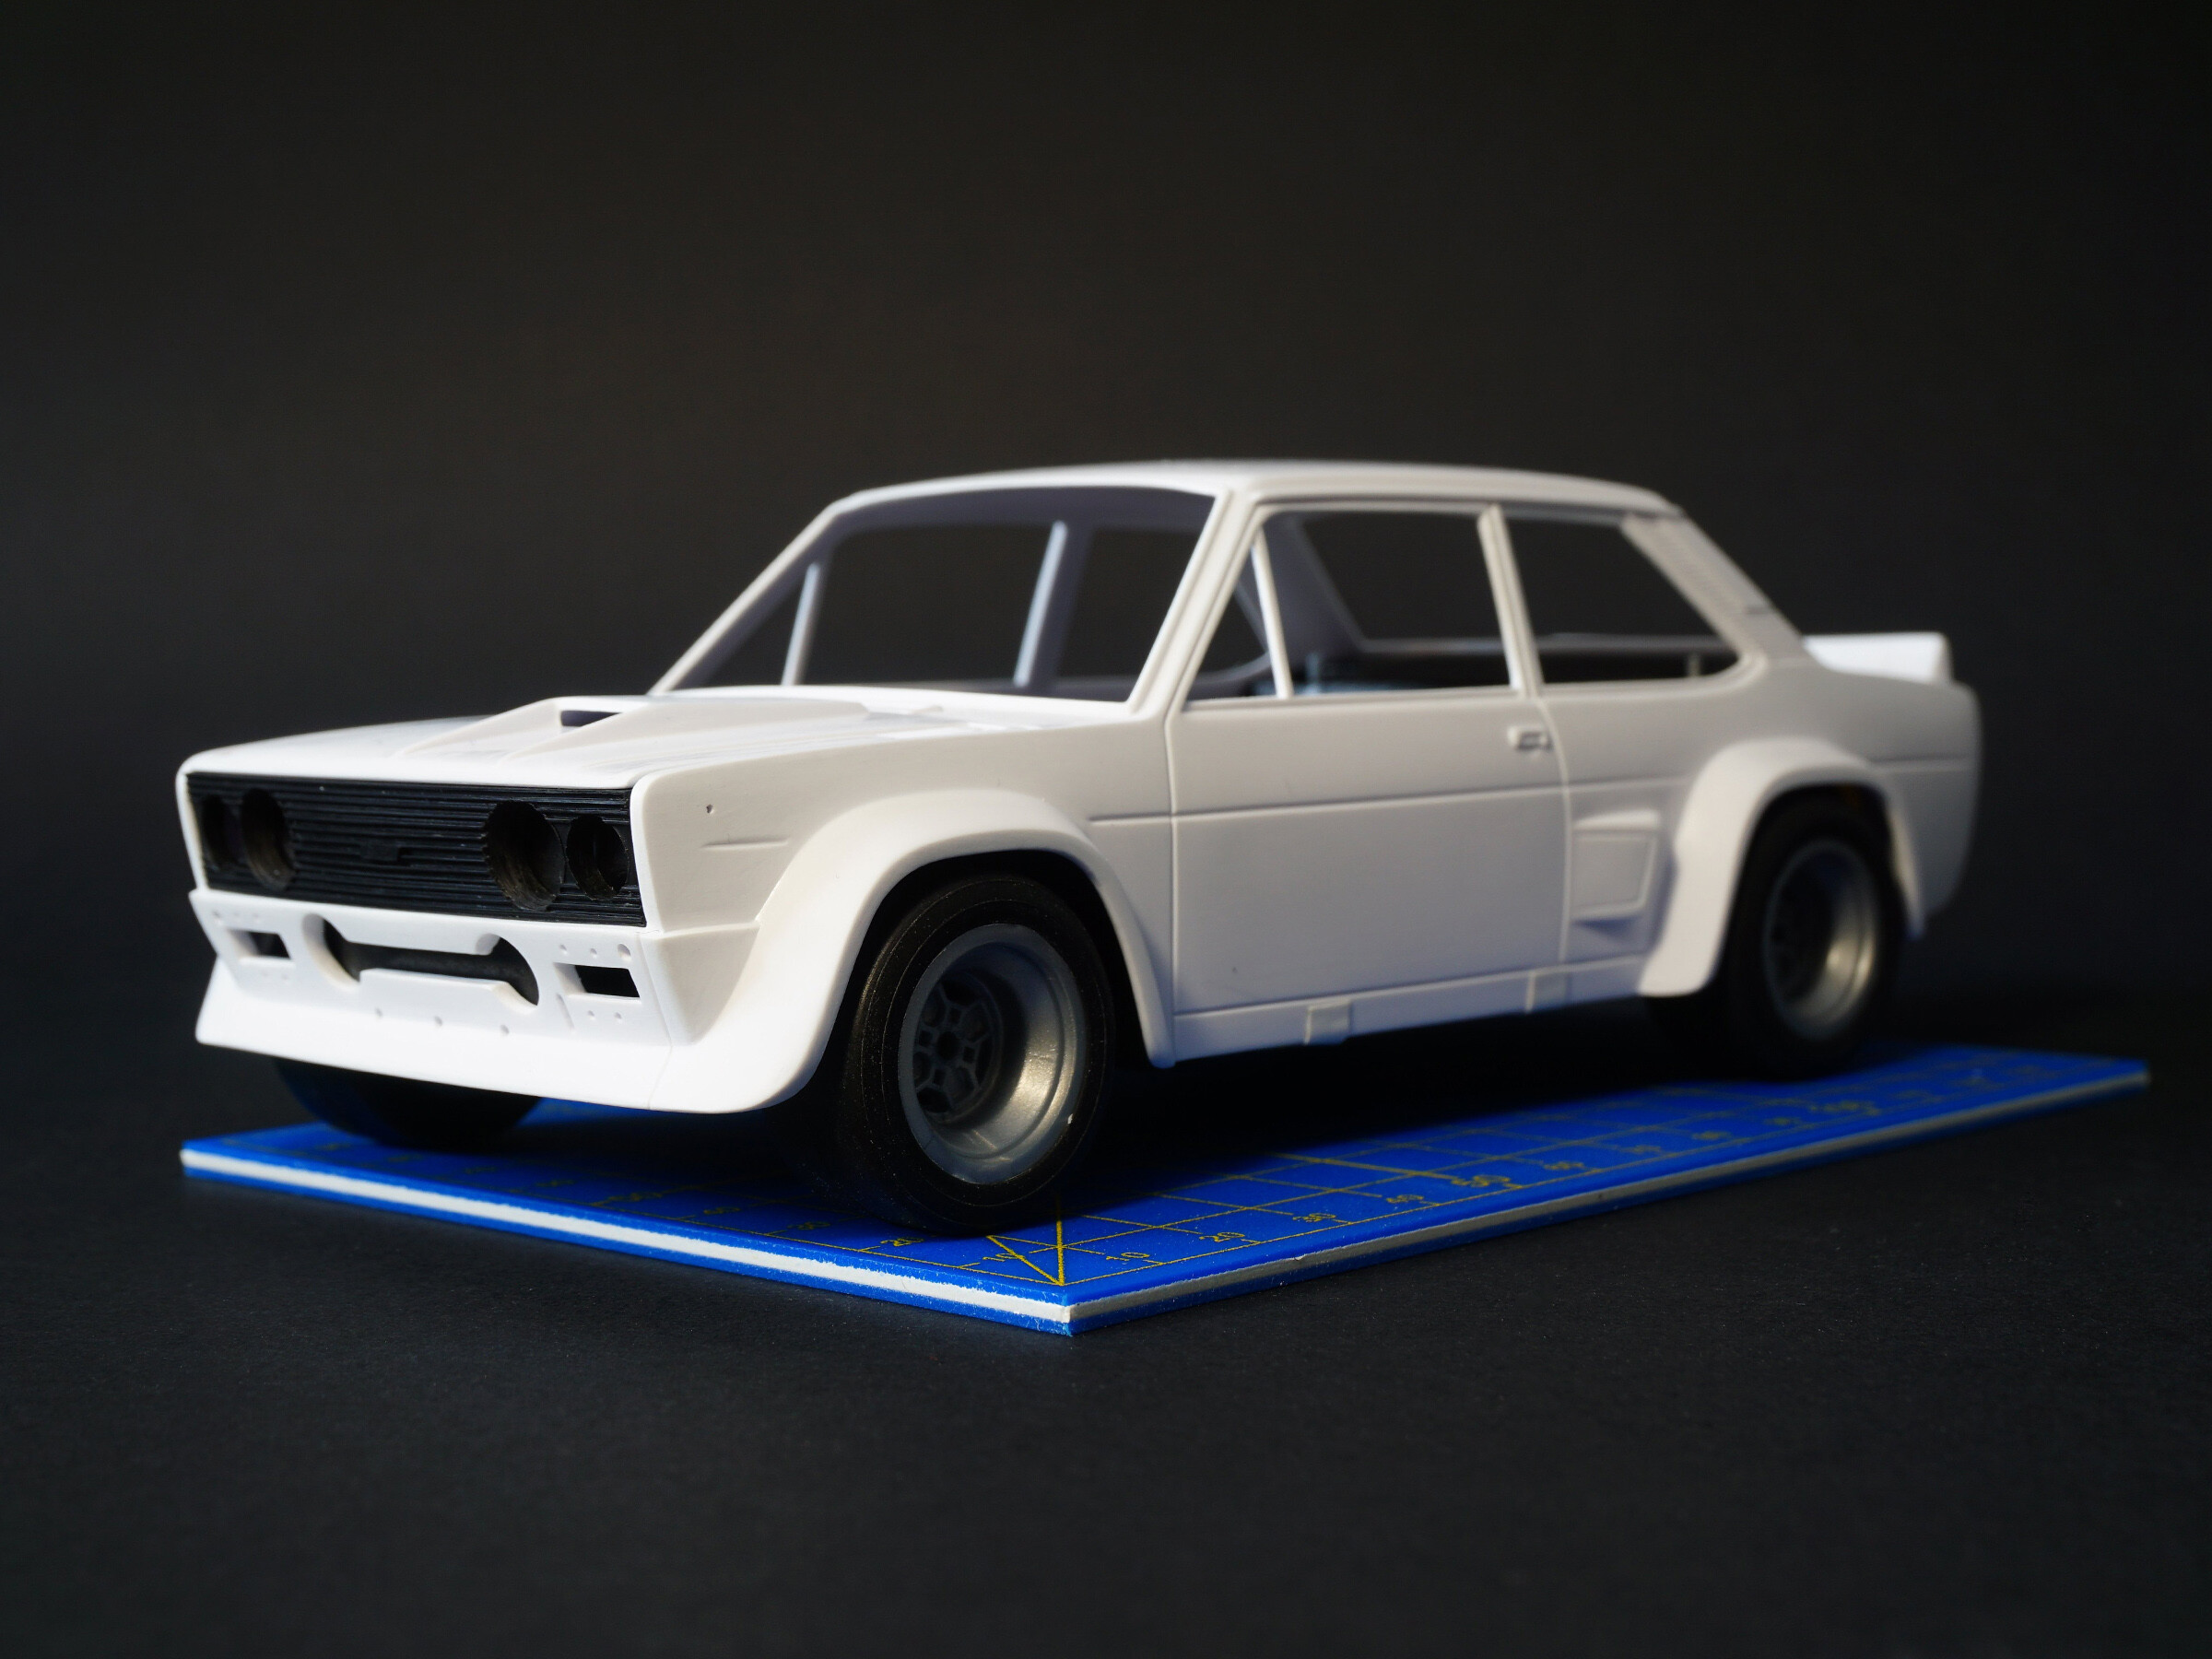
Work on rims and tires.
I drilled 17 holes in each wheel (12 for the ring mounting bolts, 4 for the rim mounting bolts and 1 for the air valve).
Products used for rims detail up are scalecars.online.
Bolts connecting the rings are 0,6 mm rivets (SCO-R025). Mounting bolts are hexagonal V.2 (SCO-R003) and tire valves V.2 (SCO-R018).
The rims are painted with gray Tamiya primer and Tamiya TS-30 base. The effect of depth and light dirt was obtained using Tamiya Panel Line Accent Color (Black). The red marks represent the rear wheels and the black marks the front ones. The slick tires come from Tamiya's Toyota Celica ST-185. Tire markers are Decalcas decals.


Fiat painted with white primer. A few tweaks between layers, but the worst is behind me. Mirafiori finally has the right shape!


Update 3 | 14.10.2023
The model was painted Tamiya TS-26.
I also added masking.


The first effect of painting blue stripes on Fiat.


The step between the layers of paint has been eliminated. Additionally, I painted the Fiat with several thin layers of TS-13. It's time for the first series of decals.


The model was re-painted with TS-13. Then many hours of polishing using sandpapers from 2000 to 7000 grit and Tamiya polishing pastes. The next step is to make the dividing lines and paint the window seals in order to start the second series of wrapping the Abarth.
Even though I managed to avoid the mistakes in the manual regarding the placement of decals, the model is still not 100% consistent with the original car. Some of the decals are the wrong size, e.g. the Italian flags on the doors are too small. Crew names and rally plates too.


One of the milestones of this model has been achieved! The rear lamps are Decalcas, reflectors made of cigarette silver.


Fiat headlights partially finished. I got rid of those hideous flat headlights from the grill and replaced them with headlights from an Opel Manta. And that's how I cured my Abarth of blindness! The "Fiat" logo comes from the Renaissance TK24/202 valorization set.


The towbar and turn signal lamps are the Renaissance TK24/202 valorization kit. I found the position lights in a box with unused parts from other models and I don't know which one they come from... They're not perfect, but I think they look good. The halogen mounting bolts (temporarily missing) are a scalecars.online product - Rivets 0,7 mm (round head) (SCO-R046).
The halogen lamps mounted in the bumper come from the Subaru Impreza WRC 1999 model.


These are further steps to make the Fiat look like the original car from the 1980 Monte Carlo Rally.
All lights in place. I also put mesh in the bumper and small orange reflectors on the front wheel arches.


The license plate is a modified Mini Cooper plate and an appropriately cut decal from the Fiat set. The hood latches are a SCO product - (SCO-R016). I made the rubber cover of the trunk lid lock from a 1,0 mm rivet with a round head - (SCO-R024). The towing hitch is the Renaissance TK24/202 valorization set.


Work on the chassis. The floor pan required many modifications (like everything on this model) - an additional cover for the rear bulkhead, a removed front panel in the engine compartment, numerous reamings for belts, fuel lines and electrical wiring. Additionally, I plugged the hole in the rear part of the chassis.


One of the modifications to the Fiat interior was the modification of the rear partition of the model. I added a strengthening plate and enriched it with SCO round head rivets - 1.0 mm (SCO-R024). After installing the rivets, I painted the interior with Humbrol Matte Black and then Tamiya TS-29 Semi Gloss Black.


The next stage of work was the interior equipment - the first was the fire extinguishing system. SCO products were used for valorization. The fire hose is 0.6 mm wires (SCO-A001) and the handles are T-handles (SCO-R064).
There are also bolts for mounting shock absorbers inside - hexagonal V.2 (SCO-R003). The pilot's riser comes from the Renaissance TK24/202 valorization set.


Black electrical wires - SCO - 0.6 mm (SCO-A001)
Fuel lines - 0.6 mm Top Studio
The pedal covers come from the Renaissance TK24/202 valorization set


Work on the seats. To make the rally buckets look good, their shape had to be refined and the sides had to be drilled for the seat belts. I painted the seats with Humbrol matte black and matte clear, also from Humbrol. The mounts come from the Renaissance TK24/202 valorization set.
Racing seatbelt buckles from SCO (SCO-R020) were used.


Other interior details include the handbrake lever, to which I added a hydraulic hose. The gear lever comes from the Renaissance TK24/202 valorization set. I pulled out my driving gloves from a 2001 Subaru Impreza from Tamiya.
I paid a lot of attention to the dashboard, for which I used SCO products - notebook (SCO-R035), ON/OFF switches (SCO-R001), warning lamps made of 1.0 mm rivets (SCO-R024). I made the heater sliders from 0.2 mm wire. The baseball cap comes from the Peugeot 206 WRC 2002 Tamiya model. Pirelli decal from Subaru Impreza WRC 2001.
The Fiat steering wheel was drilled and I used SCO rivets - 0.5 mm (SCO-R042) to attach it. The steering column shifters are made and bent to the appropriate shape from 0.4 mm wire. I used 0.3 mm wire to make the wires that run under the steering column.


The helmet holder comes from a Subaru Impreza 2001 Tamiya. The part was cut to the appropriate shape and then painted with a gray primer. Finally, wash to obtain a "spongy" effect. I made the sponges on the roll cage using masking tape. The pilot lamp comes from an Opel Manta 400 from Belkits. I made the intercom cables from 0.3 mm wire.


I'm starting the next chapter of my work on Fiat. I decided to valorize my model by changing the engine.
I will use the GPmodeling product. The set from the Italian company, apart from the engine and gearbox, also included a front grill and lamp reflectors. These elements are unnecessary for me because I have already converted the original grill.
First work on the new engine and first assembly tests. I connected the engine to the gearbox, changed the details in the Kugelfischer fuel pump to route the fuel lines to the carburetor. I had to narrow the stringers in the chassis or there wouldn't be enough room for the exhaust manifold and oil cooler lines.
Finally, I took photos comparing the original kit engine with the new one.


2. Three belts with rollers separately (unfortunately the alternator roller was damaged)
3. Each roller separately without belts (unfortunately the timing rollers were damaged)


It's time to install the cables and motor cable!
The last component mounted to the engine before installing it on the model is the exhaust manifold.
This is what the finished engine looks like:


The control module connected to the ignition coil - I made it from parts from SCO - ignition boxes SCO-R063. The coolant reservoir was painted to imitate the presence of coolant inside. I used a similar technique to make brake fluid reservoirs. Additionally, I replaced the caps in all fluid tanks.


I also added a lower differential cover and reworked the mounting bracket.
The part was painted with Humbrol 11 and then Humbrol Clear Matt. The next stage of work is wash - Tamiya Weathering Master Colors Set B and Humbrol Gray Wash. I enriched the converted drive shaft with SCO-R038 "bolts".


There was a lot of work on the model's suspension and brakes, as corrections and valorizations had to be made. I removed the calipers from the original brake discs so that I could place the metal discs from the Renaissance set there.
Before installation, the discs were sanded with sandpaper on a Dremel to obtain the effect of natural wear.
The calipers also from the Renaissance kit have been thickened to look right.


To say that assembling the suspension in this model was demanding is an understatement... The list of alterations and modifications includes a front stabilizer made from scratch, which was obviously missing, and a steering gear enriched with details.
Additionally, the wishbones and the gearbox have been equipped with SCO-R058 bolts. Work on the chassis and interior has been completed, and the whole thing looks like this:


More photos of the completed model here | Gallery
Author | Krzysztof Szpakowski
Next workbench | Alfa Romeo 8C Roadster

© 2025 | Cookies Policy | Terms & Conditions